
"Why do you paint what your do?"
These are questions every artists get asked. Ones that I used to brush aside for years. (unintentional pun there, honest) But lately I have been revisiting and re-inventing these, which is one of the cool things you can do with any creative endeavor; a free form evaluation of sorts (at least as much as your free time and/or client demands will allow).


Part 1 Selection and Planning
Selecting the Image
Facebook, like everything else today, is revolutionizing this process for me. I tool along my FB stream and when I see an appealing image I place it in a folder and then come back to it, to see if it really still "speaks" to me (pompous artists talk I know, yet best word choice here). The idea of having someone pose for me with my crazy schedule is not a possibility at this point. Besides most people hate posing and I detest trying to recreate the perfect light with each sitting.
So to the photos I go...in my subjects I am looking for three things:
1. sentimentality
2. strong composition
3. good balance of lights and darks
Just about a month ago a cute young family I know posted this photo among others of their last day of their family vacation at the beach...

Little Man at the Beach
This cute guy has it all going for me.
1. Sentimental- I absolutely adore this little man. My sister’s grandson. He rocks the coolest amber necklace and will play ball with you until the cows come home. Plus he is at the beach! What's not to love?
2. Composition-I also fell in love with this composition. His arms are in a great dynamic angle, those cute chubby splayed fingers will be a delight to render. The foreshortening of the arm and slight bird’s eye view speak to my love of perspective.
3. Lights and Darks (a.k.a. tonal scale)- The natural lighting creates a solid range of lights and shadows that I am looking forward to working with. Clear cut cast shadow and mid-tones help to define form on those cute cubby little fingers, toes, cheeks, etc...
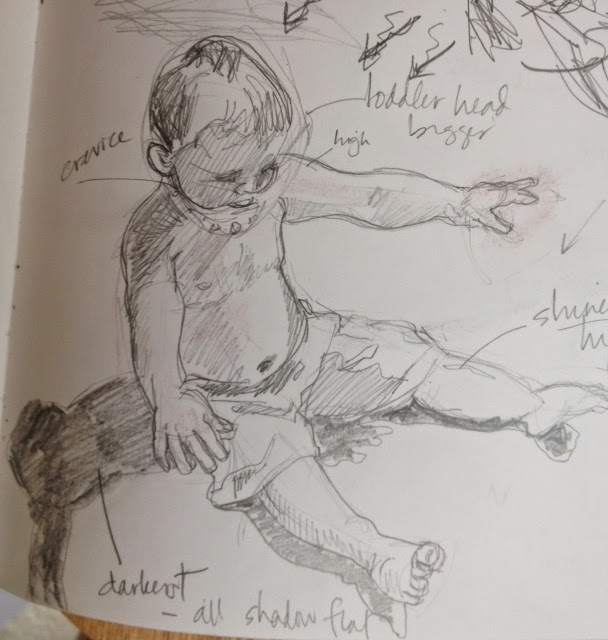
Sketching It Out
Just because all the above check out doesn't mean it is a go for me. To clinch the deal, I work through a series of progressively complex sketches to make sure my eye and brain want to work with this image too...

Gesture Study
First a few quick gestural sketches to get the feel of the composition...
Mapping Study
Secondly a slower sketch or two to plan out lights and darks as well as work on proportions
(for later reference, like a map)

Contour Study
Next it is onto sketches that emphasize the contours of the subject. In this case, I wanted to really get down those cute little toes, tummy, fingers and cheeks.
My final set of prep sketches do look a little creepy...disembodied baby arms and legs. But I have good reason to do these.

I draw these close up details of areas that I think will make the piece distinctive or may be challenging. In them, I combine contour with tonal scale. This is where I start planning to take some "artistic license" in my upcoming paintings. (For example, I decided that this point to leave the sand off of the fingers and toes as well as the pattern off of the swim suit...)
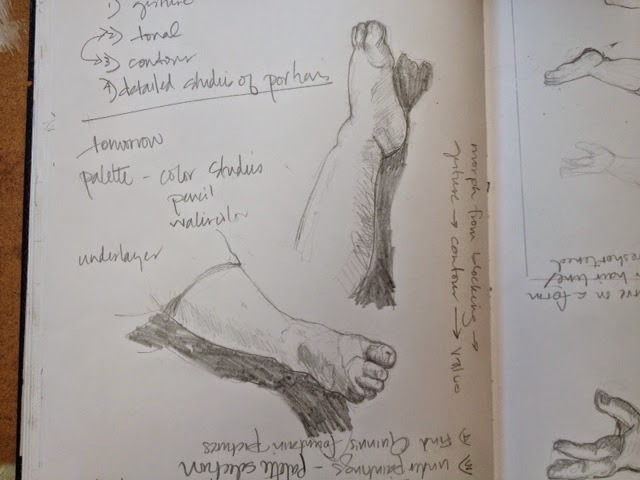
Detailed In-Depth Studies

In-Process Study
I will still occasionally go back and do some in process sketching during painting when I need to get rid of color because it is getting the way of decisions I need to make...
Planning a Series
So now I know this image is a go. Because I do not want to keep re-inventing the wheel, little man and I will be hanging out a while together. He will be the subject matter for my next 3 or 4 paintings. I use all these decision making and planning for this composition in which I will change up either process, scale and materials...
Have you noticed?
1. These sketches do not really look like the little man, do they?
2. Several hours into this and no paints to be seen yet!
Part 2 Image Transfer and Actual Painting
"Are you allowed to do that?"
"That's not right, is it?"
These kind of questions used to frustrate me but now they flatter me. It’s good to know others are getting that interested in my art and process to ask them. Besides, I should know the answers to them since I am the artist, right?
Transferring the Image
Okay, true confession time.
Sometimes I use mechanical and/or tracing devices to put my image on the ground. And (shudders) I teach others to do it too. Yes at times I feel like when others find out this dirty little secret of mine, it's like I have just been caught selling illegal drugs to little bunny babies or something like that. (Which I would never do BTW)
Well if I am guilty of a crime, then so is Michelangelo and DaVinci. They did it too! In fact some of the figures on the Sistine Chapel are the same image repeatedly transferred. He just changed the details, like hair and clothing to make them individual.
Besides, my sketching abilities are well used in the planning stage where it does serve a crucial point. Sketching gets me and my brain planning and thinking much more in depth than I would by just looking. It is not that I do not want to draw free form on my final ground. I often do but at certain times (in this case, a small image size 6"x6") I want my image to be as clean as possible.
So I use my projector and make three image transfers onto 6"x6" gessoed masonite boards. No photos since it is not very exciting...
Actual (Under) Painting!!
Called dead coloring by the old masters, it was originally a monochromatic tonal study under the final work to add richness to the finished oil painting.
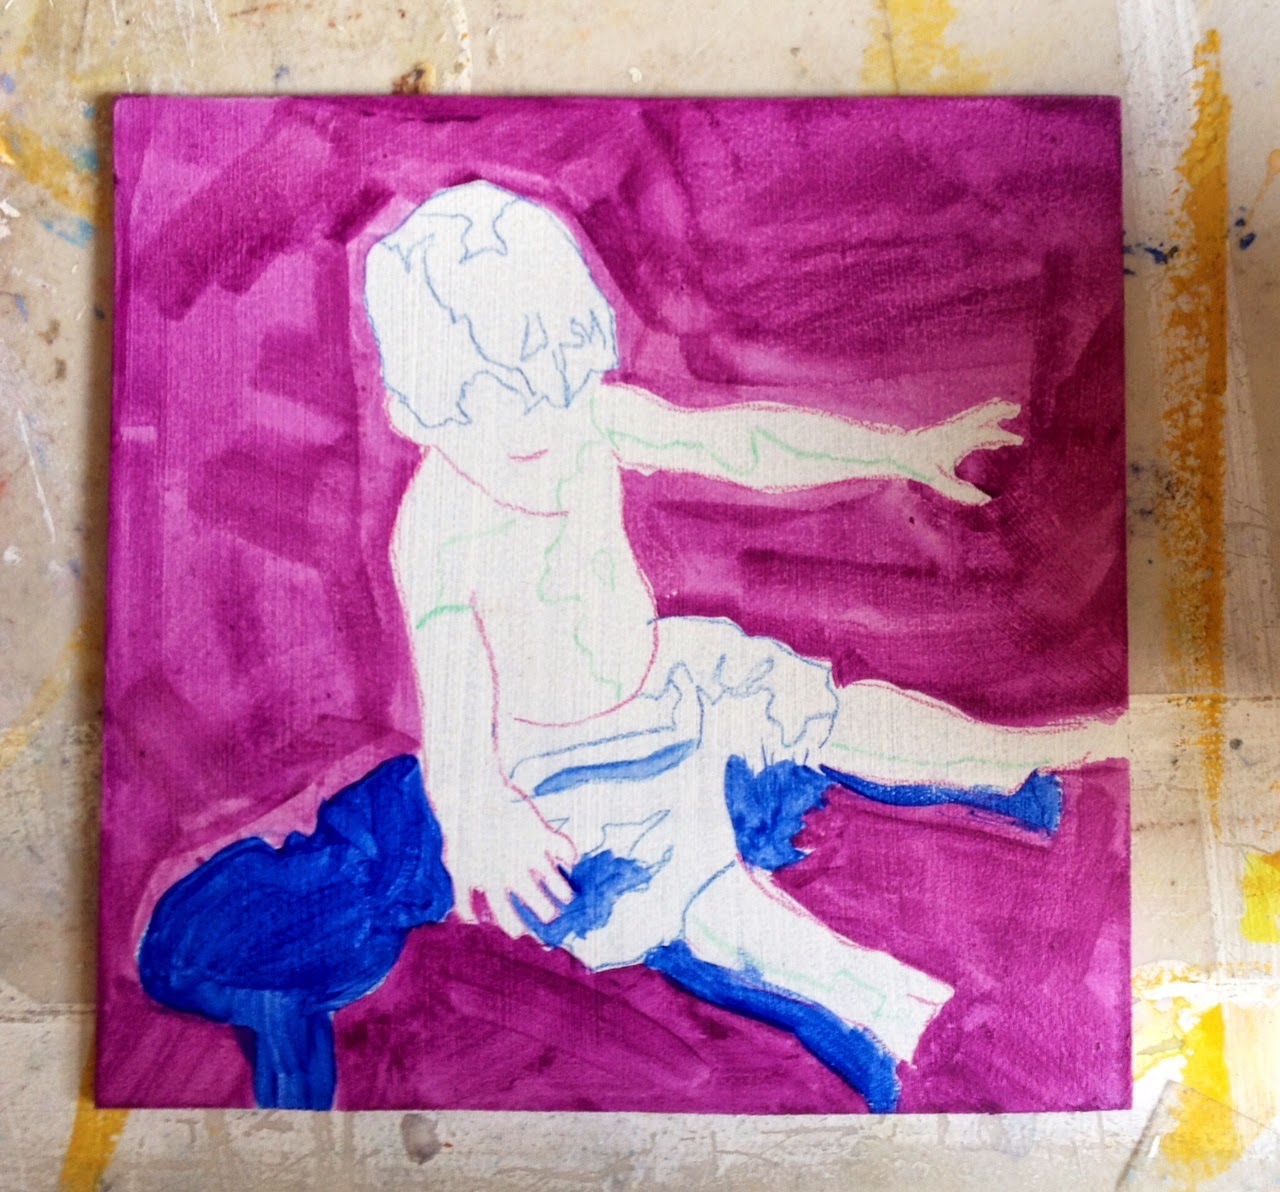
Halfway Finished Underpainting with Image Transfer
But being the child of Pop Art that I am and using those lightening fast-drying acrylics, I like bright subjective colors in my underpainting. Would not exactly call these colors "dead". I think it's more like Warhol than Vermeer here...
(BTW I think any of these paintings from here on out can be considered "finished" paintings. It is just a matter of how far the artist wants to push it, what they are trying to achieve. Obviously, realism dictates more steps and greater detail)
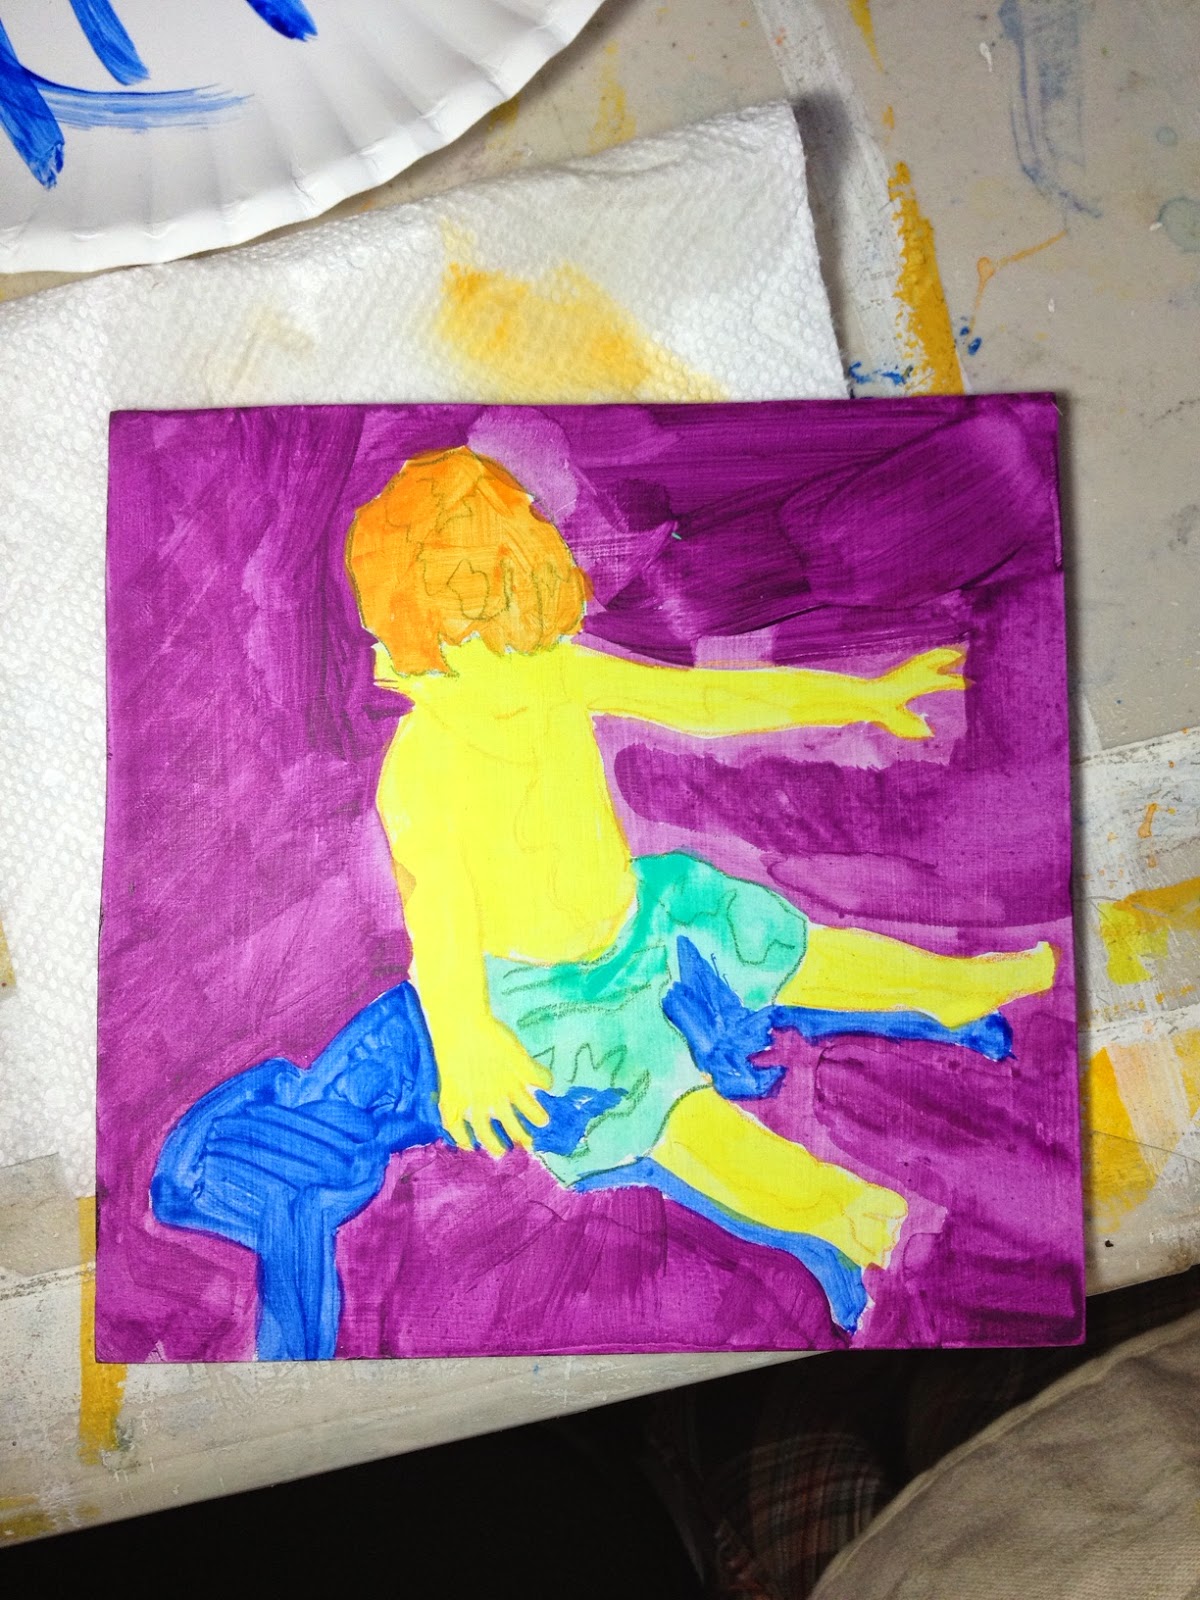
Finished Underpainting
Palette: ultramarine blue, turquoise, lemon yellow, cadnium orange, and dioxazine purple.
These color have nothing to do with tone and everything to do with the energy I want the piece to convey (more 60's new agey influence here). Just how much these will remain visible in the finished pieces are decided on later. But no matter how much I try to cover it all up the sense of color from the underpainting will always peek through.
Real Actual Painting
Hot dog! Now I can finally get down to it! I have selected my local colors and put them aside on my table. I usually keep my palette to about 5-7 colors (buff white, burnt umber, red sienna, paynes' gray, naples yellow and ultramarine blue for my little man) and mix whatever else is needed from there.
The beach sand is a combination of buff white and burnt umber...also a glaze of red sienna helps to calm down that hair and flesh tone settles down that lemon yellow too, doesn't it? Yet looking closely you can still see the ultramarine shadow under the sand-that is why "hyper-energy" colors are used it the underpainting.

I usually paint one of several orders as the rest of the painting allows me...either
1. big to small
2. back to front
or
3. top to bottom
Moving up and down the scale
So little man is coming along. I have put in all the local colors. and been playing with the tonal value of his hair by adding burnt umber and naples yellow. He is starting to look more like his photograph...

Now it is just a matter of how small to paint, how far to go out on the edges of the value scale. Using acrylics gives me the blessing and the pressure of a quick open time (how long it remains wet after application). This forces me to make fast decisions on one hand but on the other, it allows me layer as much as I want.

Tonal values start to make this figure pop off the ground

An occasional reference back to the photo lets me know things are still working...
Further details, some glazing and ...

Finished!
Waiting for the Next Wave-slow version
Acrylic Paint
6"x6"
2014

You’ve Come Along Way Baby
5 Hours vs. 5 Minutes
Now comes a really fun part.
I take all that decision making and experimenting from the first painting and put it into my second one. Remember that other board I also image transferred and underpainted then put aside? Because I am painting the second one in about 1/300th of the time that I took to do the first one, I mix all my colors ahead of time first....obviously so I can work faster.
Still working in the same order but sloppier.

Big to Small. Back to Front. Top to Bottom.
Since my form was not as defined as I wanted, scraffito lines were put in to clarify the figure, with the delightful extra of revealing those hyper underpainting colors.

Waiting for the Next Wave-fast version
Acrylic Paint
6"x6"
2014
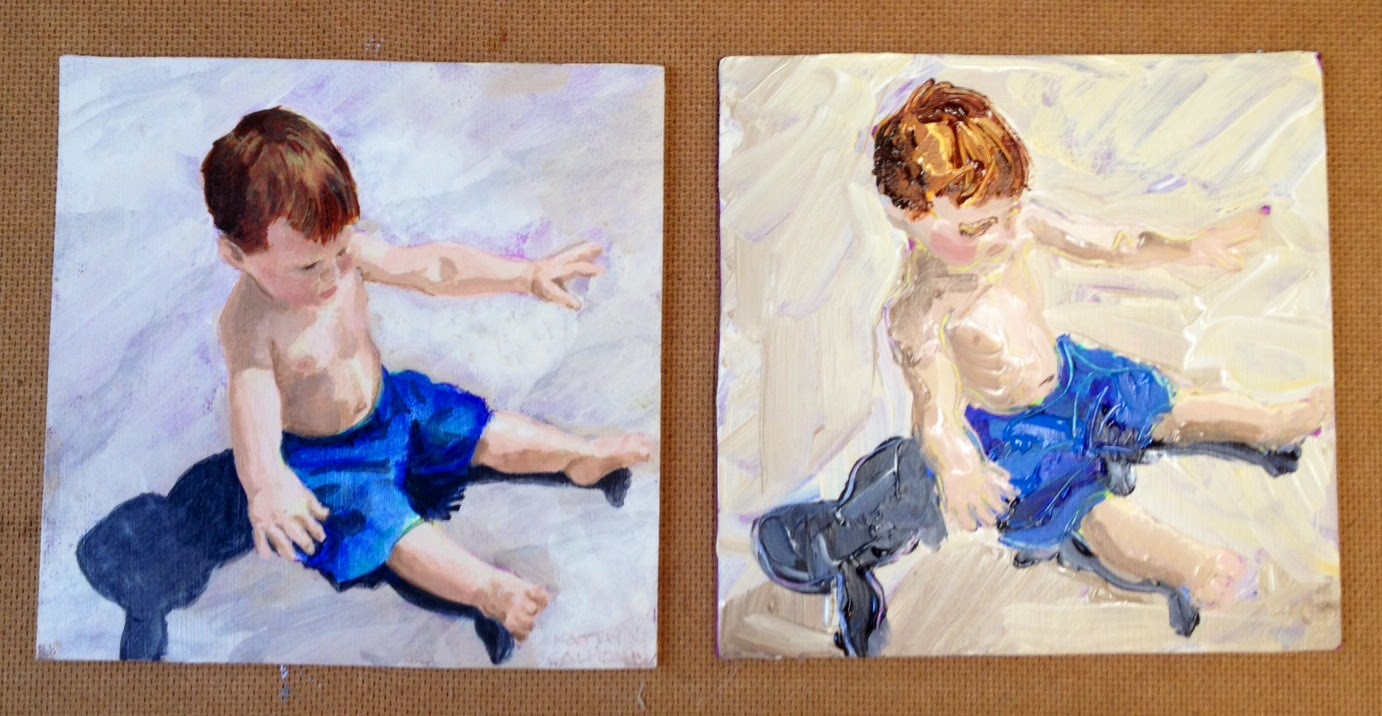
What a difference technique makes! Everything else is just the same.

All dressed up their new frames and ready for my wall at CrossRoads Art Center


